Through work, I have paid license to windsurf (recently renamed to "devin"), an application for LLM-based (aka, "Agentic") development.
I hadn't been using it that much, but in an effort to more clearly understand how this whole AI development thing works, I decided to give it a closer look recently.
My conclusions:
In its current form, this whole LLM wave is problematic for multiple reasons. But ignoring that, and looking at the technology only, I can say that:
- it is a paradigm shift;
- it is, at the technological level, a positive evolution;
- and it is a threat to free software.
Problems
Lest someone (incorrectly) assume that I am arguing in favour of the current state of affairs with regards to LLMs, let me state this first.
The way LLMs are built today is highly parasitic. Websites are downloaded in whole, at unsustainable rates, regardless of the consent of the people who made the original content. The result is predictable: servers get overloaded, server administrators attempt to implement various mitigations. Some of these mitigations work; some do, for a while; some are entirely useless. In actual fact, the mitigations are an arms race -- if too many people implement the same mitigation, then the people who try to build yet another LLM so they can extract rent will just try to work around the mitigation, eventually they will succeed, and you'll just have to come up with another mitigation. It's a bit like spam; you introduce regex-based spam filters, they introduce spelling mistakes, you introduce bayesian filters, they add a large batch of markov chain-generated semi-nonsense words made invisible by markup, you add filters to block emails with such markup, they move the text into an image. We have working mitigations today, but eventually we'll run out of ideas.
LLMs glob up everything they can while ignoring the license of the source material. The people who push those LLMs claim that pushing the source material through the machine learning algorithms makes the output of the algorithm distinct enough from the source material that the license no longer applies; I'm not so sure that this is true. I guess the New York Times v OpenAI lawsuit will teach us some of the answer to that question here, but even so the ethical questions about "is it OK to bring down another server just so we can download the internet for another for-pay LLM" are still open. And regardless of what the law states, my opinion on "you're using my copyleft code to generate code under a different license" is not something you might like if you agree with the rent seekers' opinion on the subject.
That all being said and true, the technology works. You can have a "conversation" with an LLM that resembles a human one. If you pass it some data, you can use plain english to ask it questions about that data, which is a lot easier than to ask it about that in a formal way. You can request it to generate some code, and it will generate something that looks like what you need and that will be mostly correct for like 95% of the time.
Now, yes, 95% of the time is not 100% of the time, and no, you can't ask it to "write me a piece of software that implements this 300-page requirements document and get back to me when you're done", because it will fail, and you won't know where it has failed, and you'll take it into production and expect everything to be fine because it won't and this one minor logic bug will cause half your servers to spin and consume credits with your infrastructure provider with nothing to show for it.
But that doesn't mean you can't use an LLM to build a large piece of software. It just means you have to understand the LLMs limitations and strenghts, and use them correctly.
Here's what an LLM is good at:
- Generating plausible text
- Interpreting text to figure out what a plausible meaning or summary of that text is
- Giving vague indications as to what the probable context of a given body of text is.
It turns out that that's enough to use the LLM to build a reliable piece of software, provided you do it right.
Paradigm shift
An LLM can generate text by the truckful. The generated text could be code. Given a good enough LLM, the generated text might even run and do something useful.
You can try to blindly run the code, and if it doesn't run correctly, you can paste the error message to the LLM, and it can tell you what went wrong and how you could possibly fix it. This creates a feedback loop: you ask it for an amount of code, you run the code, you receive an error, you tell it that the code is problematic and give it the error message, it makes changes to the code, now you have something that at least no longer fails at startup.
If you ask it to add tests to make sure that your code acts as per your specification, now you get an error if and when the code doesn't act as per your specification. Or, well, at least not as per the part of the specification that was correctly turned into a unit test by the LLM.
LLMs have a context window, so if the error message is pasted in the same conversation as where the code was generated, it is able to reuse the earlier prompts to refine how it should interpret the error message that you received.
You can't really paste the source code of an entire application into the prompt of your LLM, that would quickly overrun its context window. But LLMs also allow you to provide some form of background information -- a document, say -- on which you ask it to reason. It will interpret that document, but doing so uses less of the LLMs context window. So providing the LLM with your application's source code as background information can help it understand better how your code interacts. This is especially helpful if you only provide the LLM the background information relevant to the actual question.
So now if you are able to:
- Create background context with your application's source code
- Have the LLM generate a first draft of your requested change, plus the tests to make sure it works
- Compile (if applicable) the generated code (and tests) and run said tests
- Return any error messages to the LLM with a request to correct the error
Then the combination of "getting it 95% right off the bat" and the above feedback loop means you can generate syntactically correct code, that probably does what you need, in minutes.
I say "probably" for a reason. There are going to be cases where you specify a request without a number of details (because they are implied), and the LLM will get most of those details right but just not implement the one bit because it's an automaton and it doesn't think. Or you will ask it to make sure that two bits of the application look exactly the same, without specifying that they must act the same, now and in the future, and it will just generate the same block of code twice and then in a future change it will change one but not the other.
But if you review the changes, and you have experience as a programmer, you will be able to spot most cases where the LLM got it wrong. And so it's possible, if not necessarily easy at first, to use an LLM to generate mostly correct code.
There are certain places where "mostly correct" code is not desireable. But equally, there are also cases where, "mostly correct" is good enough.
After all, most of the software you run today -- the bits of it that weren't, yet, generated by an LLM -- is only "mostly correct", too, because to err is human and we all make mistakes. If not, there wouldn't be any CVEs and your software would never do anything wrong.
Now, doing the feedback loop described above is certainly something you could do manually. You could open an account on one of the LLM websites, upload the source code of your application, ask it to generate some new feature, download the newly generated feature, run it, and then copy/paste any error messages back into the LLM.
But that's a lot of manual work of the type that computers are pretty good at. So that's what the "windsurf" tool helps you with: you run it inside your IDE -- either a VSCode-based tool that you download from their website which comes with their product preinstalled, or a separate JetBrains plugin that you can install. You can then open your entire relevant codebase in a workspace in your IDE. You then ask the LLM, through the IDE, to generate a new feature in your codebase, and to also generate the test while it's at it. It will use a mixture of LLM interpretation and non-LLM functionality to scoop out the relevant bits of your codebase to send to the LLM as background information, will send it your prompt, will download the generated code and patch or create files, will compile (if required) and run the newly generated code and tests, and will refine the generated code if the tests produce any errors. All mostly automatic; by default, running anything requires explicit confirmation. You can turn that off completely (probably not a good idea), or you can give it a whitelist of things that you don't want to confirm (perhaps OK), and the tool also passes standing instructions to the LLM to never generate any command that deletes a file (which, like with any LLM, can be overridden, but it requires you to be very stubborn and to use more credits than you'd probably like).
All this put together means you can build something without writing any piece of code, provided you do it right.
A technically positive evolution
Don't go and say, "here's a 300-page document, read it and write whatever the document says". It will get it wrong, it will write a massive test suite that it will only run at the end, it will choke itself up trying to interpret the massive amount of failures it encounters, it will fill up its context window and it will start to forget some of the requirements. That won't work.
But what you can do -- what I did, in fact -- is this.
First, create an empty workspace. Don't put any code in it.
Then, tell the LLM to generate a backend framework using technology X and a frontend framework using technology Y that initially only says "hello, world". Also add tests to it, and run the tests.
It will do that. You'll not get much, but it will work.
Then, ask it to add some UI elements. A login page, perhaps. A navigation bar. Small things. Most of it doesn't have to be functional -- but tests must be there for the bits that are, and have it run the tests and evaluate the results.
Rinse, repeat, until you have a working application.
Importantly, in between the steps, you should also run the application
yourself and see if the change was implemented correctly. Sometimes it
won't be. Sometimes there will be a subtle bug -- I at one point had a
the application hang after a few minutes. Sometimes you tell it that
there's a subtle bug, and it will discover it more quickly than you
could, and it will fix it, and in implementing the fix it will uncover
another bug, and then you have to fix that one -- the fix it came up
with for the hang was to move something to an async process on the
server, which caused the application to start spinning while trying to
create hundreds of async jobs (this is when I realized that the hang was
a deadlock due to some part of the codebase doing something that
indirectly triggered itself). Sometimes it will try to fix the bug you
tell it about, and you'll see that it's going off on a tangent that has
nothing to do with what you're seeing. It's important to keep an eye on
what it's doing, so you can guide it back on track when that happens --
when I told it about the hang, it started investigating the part of the
code which sends out emails, thinking that it could hang while waiting
for sendmail to finish, but the hang was happening when the
application was idle, not when it was sending out emails, and only
when I told it about it happening when it was idle did it find the
deadlock.
So it's not a fully automatic process, and it needs to be guided by someone who knows what they're doing. But if that is the case, you can come up with something that works. I spent evenings and breaks for about a week, and I managed to create a working application which, had I written it by hand, would have taken me a few months of full-time work to come up with. And I now have a side project, fully complete and working, that I had been thinking about doing for more than a decade, but never got around to actually doing, because of all the work that would be involved and I just didn't see myself having the time for.
It's not perfect code. But it's mostly good enough, and it will perform the job it needs to. And it looks far slicker than most of the side projects I've done in the past, because in the past I would prioritize between implementing new features or making something look slick, and I would decide that the new feature was more important because it's only for me and there's only me and nobody cares if it looks good or not and I don't have three weeks to come up with something that looks better. But here, I found myself sometimes spending 10 minutes writing a prompt with instructions on making things look better. Because what's 10 minutes when you just spent an hour writing down and refining specifications for functionality and tests?
There are a number of other things in which an LLM can help a programmer.
For instance.
I received a bug report recently in a project I'm paid to maintain that I couldn't make heads or tails of. I opened the source code in my windsurf IDE, pasted the bug report in the prompt, and then requested the tool to analyze the source code and the associated logs and tell me how the described behavior could be happening. It turned out that I had overlooked something, but with the help of the tool, I found the bug in minutes.
I was trying to understand a particular part of a large codebase that I didn't really grasp very well. I loaded the codebase in the tool, and asked it to explain to me how a particular action is performed by the code. I requested specific functions and line numbers. I now have a far better understanding of how the code works, and will be able to write that patch that I've been wanting to write for years -- without using the LLM.
I have been struggling for, literally, years with understanding why another tool that I maintain was misbehaving in a particular way but only in Firefox. I opened the codebase in Firefox, explained the buggy behavior in plain English, and asked it to explain how this could be happening. It picked up some obscure corner case behavior of ffmpeg and mp4 containers that I was not aware of and that perfectly explained why things were misbehaving in the way that they were.
At the same time, there are limitations. Giving an LLM a codebase that was originally generated by an LLM (either the same one or another one) seems to work well. Giving it a codebase that was written by a human and expecting it to correctly update it seems to be more error-prone. I did one or two of those as a trial, and it is more problematic than anything.
An LLM is also not intelligent, notwithstanding the popular term of "Artificial Intelligence". On multiple occasions, I've asked it to write a test case for some code that was not set up to do so; and rather than suggesting a refactor is required, it would instead copy the code that needed to be tested and then test the copy, rather than the original. The tool has made multiple similar errors. I have sometimes people describe agentic coding as "similar to interacting with junior programmers", but that is not the case. A junior programmer will either fill in the gaps in your specifications, or ask for clarification when something seems off. The LLM will not do that; it will do what you ask, exactly that and nothing more. If you missed a corner case in your specification, then all bets are off.
I remember learning about programming language generations in college. A first-generation language is "machine code", a second-generation language is "assembler", a third-generation language is any high-level language such as C, Perl, or Pascal. I've forgotten what set a 3rd-generation language apart from a 4th-generation language. But I remember the definition they gave me for a 5th-generation language: "you tell the computer what to do, and it will do it". At the time, I thought it was ridiculous. Nobody could ever write something like that.
But it's here.
And it's a threat to free software.
A threat to free software?
Yes.
There is the obvious part where most of the well-known LLMs are non-free software. I mean, there are some "open source" LLM models. The windsurf tool that I used doesn't allow you to use them (directly), but they're there. There are also open source applications that implement what the windsurf editor does. So it's definitely possible to work like this without resorting to non-free software and non-free services, even though the non-free LLMs might be a bit ahead of the curve of the free ones. But that's not what I mean.
And there is also the obvious thing which I mentioned earlier in this post, which is that the people who try to build LLMs are doing it in unethical, disgusting ways, causing downtimes and disregarding licenses for whatever they can get their grubby hands on. Ideally we wouldn't be in that situation, and ideally this wouldn't be a problem, but we are where we are.
And there's the obvious thing where the OSI sold itself out and declared that a machine learning program can be open source even when the very things it was built from -- the training data -- is not available. That's a major issue that the free software community needs to fight against, but there's not really anything that that is a threat to free software. You just build your own, free software, LLM, and you're done.
The actual threat is in funding and developer support.
Most large businesses do not care about free-as-in-freedom software. They like the free-as-in-beer part, and they appreciate that the free-as-in-freedom bits can make the software more customizable. They are (mostly) happy to do sponsorships of the free-as-in-freedom projects that they use if that means their free-as-in-beer usage of the software gets improved.
But why would you care about all that when you can just generate the code you need, rather than interacting with an open source community that may or may not care about your business's interests?
Where to go from here
Although I think the moral and environmental issues with LLMs are real and problematic, given the experiments I did I am not convinced that the concept of interacting with a computer system in natural language and to use it to generate code is necessarily deficient. There are pitfalls, but they can be managed. It is possible to use such a system to create throwaway, proof-of-concept type "good enough" code bases. It can be used to interpret code bases and to understand bug reports.
I believe that the major issue with LLMs has to do with that saying about hammers and nails:
If all you have is a hammer, then everything looks like a nail.
LLMs are an outgrowth of machine learning, pushed by large corporations. These large corporations have a lot of money. If all you have is money, then every problem can be fixed by throwing more money at it. The initial language models were promising but not (yet) good enough, and it seemed that one way in which they could be improved was to increase the scale of the statistics: throw more hardware (and thus money) at it, and rather than improving the efficiency of the models, just scale up.
Scaling up is something that megacorporations are very good at. It's only a money problem, after all. Does that mean that "scaling up" is the only way to improve the models, though? I'm not convinced.
Some hardware, such as most modern Apple and Samsung devices, ship with accelerator hardware for machine learning algorithms. There are some models that are small enough to be able to run on these devices. I don't see why it should not be possible to create a small(er) language model that can do some useful part of the above-described use cases; if not locally, then at least on a server that one can run on-prem rather than requiring that you pay rent to one of the LLM companies.
The Software Freedom Conservancy has published an aspirational statement on machine learning-assisted programming that, I think, gets a lot right. It's not quite a definition, but it's something to keep in mind.
Perhaps that's the way forward?
More questions than answers at this point, anyway.
When the Free Software movement started in the 1980s, most of the world had just made a transition from free university-written software to non-free, proprietary, company-written software. Because of that, the initial ethical standpoint of the Free Software foundation was that it's fine to run a non-free operating system, as long as all the software you run on that operating system is free.
Initially this was just the editor.
But as time went on, and the FSF managed to write more and more parts of the software stack, their ethical stance moved with the times. This was a, very reasonable, pragmatic stance: if you don't accept using a non-free operating system and there isn't a free operating system yet, then obviously you can't write that free operating system, and the world won't move towards a point where free operating systems exist.
In the early 1990s, when Linus initiated the Linux kernel, the situation reached the point where the original dream of a fully free software stack was complete.
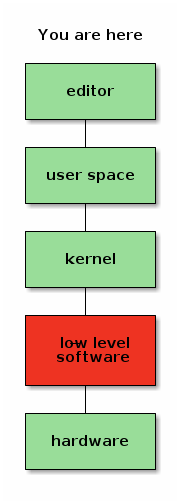
Or so it would appear.
Because, in fact, this was not the case. Computers are physical objects, composed of bits of technology that we refer to as "hardware", but in order for these bits of technology to communicate with other bits of technology in the same computer system, they need to interface with each other, usually using some form of bus protocol. These bus protocols can get very complicated, which means that a bit of software is required in order to make all the bits communicate with each other properly. Generally, this software is referred to as "firmware", but don't let that name deceive you; it's really just a bit of low-level software that is very specific to one piece of hardware. Sometimes it's written in an imperative high-level language; sometimes it's just a set of very simple initialization vectors. But whatever the case might be, it's always a bit of software.
And although we largely had a free system, this bit of low-level software was not yet free.
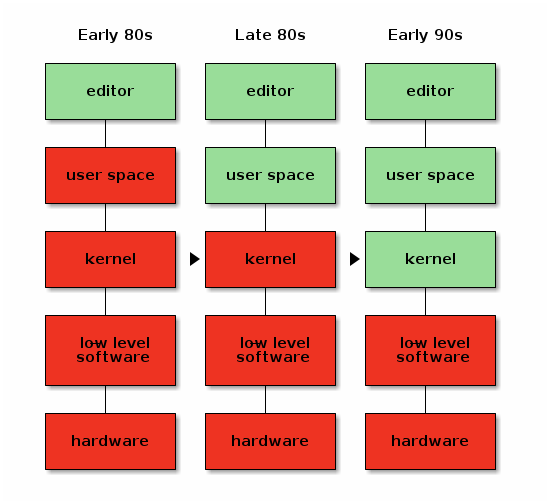
Initially, storage was expensive, so computers couldn't store as much data as today, and so most of this software was stored in ROM chips on the exact bits of hardware they were meant for. Due to this fact, it was easy to deceive yourself that the firmware wasn't there, because you never directly interacted with it. We knew it was there; in fact, for some larger pieces of this type of software it was possible, even in those days, to install updates. But that was rarely if ever done at the time, and it was easily forgotten.
And so, when the free software movement slapped itself on the back and declared victory when a fully free operating system was available, and decided that the work of creating a free software environment was finished, that only keeping it recent was further required, and that we must reject any further non-free encroachments on our fully free software stack, the free software movement was deceiving itself.
Because a computing environment can never be fully free if the low-level pieces of software that form the foundations of that computing environment are not free. It would have been one thing if the Free Software Foundation declared it ethical to use non-free low-level software on a computing environment if free alternatives were not available. But unfortunately, they did not.
In fact, something very strange happened.
In order for some free software hacker to be able to write a free replacement for some piece of non-free software, they obviously need to be able to actually install that theoretical free replacement. This isn't just a random thought; in fact it has happened.
Now, it's possible to install software on a piece of rewritable storage such as flash memory inside the hardware and boot the hardware from that, but if there is a bug in your software -- not at all unlikely if you're trying to write software for a piece of hardware that you don't have documentation for -- then it's not unfathomable that the replacement piece of software will not work, thereby reducing your expensive piece of technology to something about as useful as a paperweight.
Here's the good part.
In the late 1990s and early 2000s, the bits of technology that made up computers became so complicated, and the storage and memory available to computers so much larger and cheaper, that it became economically more feasible to create a small, tiny, piece of software stored in a ROM chip on the hardware, with just enough knowledge of the bus protocol to download the rest from the main computer.
This is awesome for free software. If you now write a replacement for the non-free software that comes with the hardware, and you make a mistake, no wobbles! You just remove power from the system, let the DRAM chips on the hardware component fully drain, return power, and try again. You might still end up with a brick of useless silicon if some of the things you sent to your technology make it do things that it was not designed to do and therefore you burn through some critical bits of metal or plastic, but the chance of this happening is significantly lower than the chance of you writing something that impedes the boot process of the piece of hardware and you are unable to fix it because the flash is overwritten. There is anecdotal evidence that there are free software hackers out there who do so. So, yay, right? You'd think the Free Software foundation would jump at the possibility to get more free software? After all, a large part of why we even have a Free Software Foundation in the first place, was because of some piece of hardware that was misbehaving, so you would think that the foundation's founders would understand the need for hardware to be controlled by software that is free.
The strange thing, what has always been strange to me, is that this is not what happened.
The Free Software Foundation instead decided that non-free software on ROM or flash chips is fine, but non-free software -- the very same non-free software, mind -- that touches the general storage device that you as a user use, is not. Never mind the fact that the non-free software is always there, whether it sits on your storage device or not.
Misguidedness aside, if some people decide they would rather not update the non-free software in their hardware and use the hardware with the old and potentially buggy version of the non-free software that it came with, then of course that's their business.
Unfortunately, it didn't quite stop there. If it had, I wouldn't have written this blog post.
You see, even though the Free Software Foundation was about Software, they decided that they needed to create a hardware certification program. And this hardware certification program ended up embedding the strange concept that if something is stored in ROM it's fine, but if something is stored on a hard drive it's not. Same hardware, same software, but different storage. By that logic, Windows respects your freedom as long as the software is written to ROM. Because this way, the Free Software Foundation could come to a standstill and pretend they were still living in the 90s.
An unfortunate result of the "RYF" program is that it means that companies who otherwise would have been inclined to create hardware that was truly free, top to bottom, are now more incentivised by the RYF program to create hardware in which the non-free low-level software can't be replaced.
Meanwhile, the rest of the world did not pretend to still be living in the nineties, and free hardware communities now exist. Because of how the FSF has marketed themselves out of the world, these communities call themselves "Open Hardware" communities, rather than "Free Hardware" ones, but the principle is the same: the designs are there, if you have the skill you can modify it, but you don't have to.
In the mean time, the open hardware community has evolved to a point where even CPUs are designed in the open, which you can design your own version of.
But not all hardware can be implemented as RISC-V, and so if you want a full system that builds RISC-V you may still need components of the system that were originally built for other architectures but that would work with RISC-V, such as a network card or a GPU. And because the FSF has done everything in their power to disincentivise people who would otherwise be well situated to build free versions of the low-level software required to support your hardware, you may now be in the weird position where we seem to have somehow skipped a step.
My own suspicion is that the universe is not only queerer than we suppose, but queerer than we can suppose.
-- J.B.S. Haldane
(comments for this post will not pass moderation. Use your own blog!)
Dear lazyweb,
At work, we are trying to rotate the GPG signing keys for the Linux packages of the eID middleware
We created new keys, and they will be installed on all Linux machines that have the eid-archive package installed soon (they were already supposed to be, but we made a mistake).
Running some tests, however, I have a bit of a problem:
[wouter@rhel rpm-gpg]$ sudo rpm --import RPM-GPG-KEY-BEID-RELEASE
[wouter@rhel rpm-gpg]$ sudo rpm --import RPM-GPG-KEY-BEID-RELEASE-2025
fout: RPM-GPG-KEY-BEID-RELEASE-2025: key 1 import failed.
[wouter@rhel rpm-gpg]$ sudo rpm --import RPM-GPG-KEY-BEID-CONTINUOUS
This is on RHEL9.
The only difference between the old keys and the new one, apart of course from the fact that the old one is, well, old, is that the old one uses the RSA algorithm whereas the new one uses ECDSA on the NIST P-384 curve (the same algorithm as the one used by the eID card).
Does RPM not support ECDSA keys? Does anyone know where this is documented?
(Yes, I probably should have tested this before publishing the new key, but this is where we are)
At work, I've been maintaining a perl script that needs to run a number of steps as part of a release workflow.
Initially, that script was very simple, but over time it has grown to do a number of things. And then some of those things did not need to be run all the time. And then we wanted to do this one exceptional thing for this one case. And so on; eventually the script became a big mess of configuration options and unreadable flow, and so I decided that I wanted it to be more configurable. I sat down and spent some time on this, and eventually came up with what I now realize is a domain-specific language (DSL) in JSON, implemented by creating objects in Moose, extensible by writing more object classes.
Let me explain how it works.
In order to explain, however, I need to explain some perl and Moose basics first. If you already know all that, you can safely skip ahead past the "Preliminaries" section that's next.
Preliminaries
Moose object creation, references.
In Moose, creating a class is done something like this:
package Foo;

use v5.40;
use Moose;

has 'attribute' => (
    is  => 'ro',
    isa => 'Str',
    required => 1
);

sub say_something {
    my $self = shift;
    say "Hello there, our attribute is " . $self->attribute;
}
The above is a class that has a single attribute called attribute.
To create an object, you use the Moose constructor on the class, and
pass it the attributes you want:
use v5.40;
use Foo;

my $foo = Foo->new(attribute => "foo");

$foo->say_something;
(output: Hello there, our attribute is foo)
This creates a new object with the attribute attribute set to bar.
The attribute accessor is a method generated by Moose, which functions
both as a getter and a setter (though in this particular case we made
the attribute "ro", meaning read-only, so while it can be set at object
creation time it cannot be changed by the setter anymore). So yay, an
object.
And it has methods, things that we set ourselves. Basic OO, all that.
One of the peculiarities of perl is its concept of "lists". Not to be confused with the lists of python -- a concept that is called "arrays" in perl and is somewhat different -- in perl, lists are enumerations of values. They can be used as initializers for arrays or hashes, and they are used as arguments to subroutines. Lists cannot be nested; whenever a hash or array is passed in a list, the list is "flattened", that is, it becomes one big list.
This means that the below script is functionally equivalent to the above script that uses our "Foo" object:
use v5.40;
use Foo;

my %args;

$args{attribute} = "foo";

my $foo = Foo->new(%args);

$foo->say_something;
(output: Hello there, our attribute is foo)
This creates a hash %args wherein we set the attributes that we want
to pass to our constructor. We set one attribute in %args, the one
called attribute, and then use %args and rely on list flattening to
create the object with the same attribute set (list flattening turns a
hash into a list of key-value pairs).
Perl also has a concept of "references". These are scalar values that point to other values; the other value can be a hash, a list, or another scalar. There is syntax to create a non-scalar value at assignment time, called anonymous references, which is useful when one wants to remember non-scoped values. By default, references are not flattened, and this is what allows you to create multidimensional values in perl; however, it is possible to request list flattening by dereferencing the reference. The below example, again functionally equivalent to the previous two examples, demonstrates this:
use v5.40;
use Foo;

my $args = {};

$args->{attribute} = "foo";

my $foo = Foo->new(%$args);

$foo->say_something;
(output: Hello there, our attribute is foo)
This creates a scalar $args, which is a reference to an anonymous
hash. Then, we set the key attribute of that anonymous hash to bar
(note the use arrow operator here, which is used to indicate that we
want to dereference a reference to a hash), and create the object using
that reference, requesting hash dereferencing and flattening by using a
double sigil, %$.
As a side note, objects in perl are references too, hence the fact that we have to use the dereferencing arrow to access the attributes and methods of Moose objects.
Moose attributes don't have to be strings or even simple scalars. They can also be references to hashes or arrays, or even other objects:
package Bar;

use v5.40;
use Moose;

extends 'Foo';

has 'hash_attribute' => (
    is => 'ro',
    isa => 'HashRef[Str]',
    predicate => 'has_hash_attribute',
);

has 'object_attribute' => (
    is => 'ro',
    isa => 'Foo',
    predicate => 'has_object_attribute',
);

sub say_something {
    my $self = shift;

    if($self->has_object_attribute) {
        $self->object_attribute->say_something;
    }

    $self->SUPER::say_something unless $self->has_hash_attribute;

    say "We have a hash attribute!"
}
This creates a subclass of Foo called Bar that has a hash
attribute called hash_attribute, and an object attribute called
object_attribute. Both of them are references; one to a hash, the
other to an object. The hash ref is further limited in that it requires
that each value in the hash must be a string (this is optional but can
occasionally be useful), and the object ref in that it must refer to an
object of the class Foo, or any of its subclasses.
The predicates used here are extra subroutines that Moose provides if
you ask for them, and which allow you to see if an object's attribute
has a value or not.
The example script would use an object like this:
use v5.40;
use Bar;

my $foo = Foo->new(attribute => "foo");

my $bar = Bar->new(object_attribute => $foo, attribute => "bar");

$bar->say_something;
(output: Hello there, our attribute is foo)
This example also shows object inheritance, and methods implemented in child classes.
Okay, that's it for perl and Moose basics. On to...
Moose Coercion
Moose has a concept of "value coercion". Value coercion allows you to tell Moose that if it sees one thing but expects another, it should convert is using a passed subroutine before assigning the value.
That sounds a bit dense without example, so let me show you how it
works. Reimaginging the Bar package, we could use coercion to
eliminate one object creation step from the creation of a Bar object:
package "Bar";

use v5.40;

use Moose;
use Moose::Util::TypeConstraints;

extends "Foo";

coerce "Foo",
    from "HashRef",
    via { Foo->new(%$_) };

has 'hash_attribute' => (
    is => 'ro',
    isa => 'HashRef',
    predicate => 'has_hash_attribute',
);

has 'object_attribute' => (
    is => 'ro',
    isa => 'Foo',
    coerce => 1,
    predicate => 'has_object_attribute',
);

sub say_something {
    my $self = shift;

    if($self->has_object_attribute) {
        $self->object_attribute->say_something;
    }

    $self->SUPER::say_something unless $self->has_hash_attribute;

    say "We have a hash attribute!"
}
Okay, let's unpack that a bit.
First, we add the Moose::Util::TypeConstraints module to our package.
This is required to declare coercions.
Then, we declare a coercion to tell Moose how to convert a HashRef to
a Foo object: by using the Foo constructor on a flattened list
created from the hashref that it is given.
Then, we update the definition of the object_attribute to say that it
should use coercions. This is not the default, because going through the
list of coercions to find the right one has a performance penalty, so if
the coercion is not requested then we do not do it.
This allows us to simplify declarations. With the updated Bar class,
we can simplify our example script to this:
use v5.40;

use Bar;

my $bar = Bar->new(attribute => "bar", object_attribute => { attribute => "foo" });

$bar->say_something
(output: Hello there, our attribute is foo)
Here, the coercion kicks in because the value object_attribute, which
is supposed to be an object of class Foo, is instead a hash ref.
Without the coercion, this would produce an error message saying that
the type of the object_attribute attribute is not a Foo object. With
the coercion, however, the value that we pass to object_attribute is
passed to a Foo constructor using list flattening, and then the
resulting Foo object is assigned to the object_attribute attribute.
Coercion works for more complicated things, too; for instance, you can use coercion to coerce an array of hashes into an array of objects, by creating a subtype first:
package MyCoercions;
use v5.40;

use Moose;
use Moose::Util::TypeConstraints;

use Foo;

subtype "ArrayOfFoo", as "ArrayRef[Foo]";
subtype "ArrayOfHashes", as "ArrayRef[HashRef]";

coerce "ArrayOfFoo", from "ArrayOfHashes", via { [ map { Foo->create(%$_) } @{$_} ] };
Ick. That's a bit more complex.
What happens here is that we use the map function to iterate over a
list of values.
The given list of values is @{$_}, which is perl for "dereference the
default value as an array reference, and flatten the list of values in
that array reference".
So the ArrayRef of HashRefs is dereferenced and flattened, and each
HashRef in the ArrayRef is passed to the map function.
The map function then takes each hash ref in turn and passes it to the
block of code that it is also given. In this case, that block is
{ Foo->create(%$_) }. In other words, we invoke the create factory
method with the flattened hashref as an argument. This returns an object
of the correct implementation (assuming our hash ref has a type
attribute set), and with all attributes of their object set to the
correct value. That value is then returned from the block (this could be
made more explicit with a return call, but that is optional, perl
defaults a return value to the rvalue of the last expression in a
block).
The map function then returns a list of all the created objects, which
we capture in an anonymous array ref (the [] square brackets), i.e.,
an ArrayRef of Foo object, passing the Moose requirement of
ArrayRef[Foo].
Usually, I tend to put my coercions in a special-purpose package. Although it is not strictly required by Moose, I find that it is useful to do this, because Moose does not allow a coercion to be defined if a coercion for the same type had already been done in a different package. And while it is theoretically possible to make sure you only ever declare a coercion once in your entire codebase, I find that doing so is easier to remember if you put all your coercions in a specific package.
Okay, now you understand Moose object coercion! On to...
Dynamic module loading
Perl allows loading modules at runtime. In the most simple case, you just use require inside a stringy eval:
my $module = "Foo";
eval "require $module";
This loads "Foo" at runtime. Obviously, the $module string could be a computed value, it does not have to be hardcoded.
There are some obvious downsides to doing things this way, mostly in the fact that a computed value can basically be anything and so without proper checks this can quickly become an arbitrary code vulnerability. As such, there are a number of distributions on CPAN to help you with the low-level stuff of figuring out what the possible modules are, and how to load them.
For the purposes of my script, I used Module::Pluggable. Its API is fairly simple and straightforward:
package Foo;

use v5.40;
use Moose;

use Module::Pluggable require => 1;

has 'attribute' => (
    is => 'ro',
    isa => 'Str',
);

has 'type' => (
    is => 'ro',
    isa => 'Str',
    required => 1,
);

sub handles_type {
    return 0;
}

sub create {
    my $class = shift;
    my %data = @_;

    foreach my $impl($class->plugins) {
        if($impl->can("handles_type") && $impl->handles_type($data{type})) {
            return $impl->new(%data);
        }
    }
    die "could not find a plugin for type " . $data{type};
}

sub say_something {
    my $self = shift;
    say "Hello there, I am a " . $self->type;
}
The new concept here is the plugins class method, which is added by
Module::Pluggable, and which searches perl's library paths for all
modules that are in our namespace. The namespace is configurable, but by
default it is the name of our module; so in the above example, if there
were a package "Foo::Bar" which
- has a subroutine
handles_type - that returns a truthy value when passed the value of the
typekey in a hash that is passed to thecreatesubroutine, - then the
createsubroutine creates a new object with the passed key/value pairs used as attribute initializers.
Let's implement a Foo::Bar package:
package Foo::Bar;

use v5.40;
use Moose;

extends 'Foo';

has 'type' => (
    is => 'ro',
    isa => 'Str',
    required => 1,
);

has 'serves_drinks' => (
    is => 'ro',
    isa => 'Bool',
    default => 0,
);

sub handles_type {
    my $class = shift;
    my $type = shift;

    return $type eq "bar";
}

sub say_something {
    my $self = shift;
    $self->SUPER::say_something;
    say "I serve drinks!" if $self->serves_drinks;
}
We can now indirectly use the Foo::Bar package in our script:
use v5.40;
use Foo;

my $obj = Foo->create(type => bar, serves_drinks => 1);

$obj->say_something;
output:
Hello there, I am a bar.
I serve drinks!
Okay, now you understand all the bits and pieces that are needed to understand how I created the DSL engine. On to...
Putting it all together
We're actually quite close already. The create factory method in the
last version of our Foo package allows us to decide at run time which
module to instantiate an object of, and to load that module at run time.
We can use coercion and list flattening to turn a reference to a hash
into an object of the correct type.
We haven't looked yet at how to turn a JSON data structure into a hash, but that bit is actually ridiculously trivial:
use JSON::MaybeXS;

my $data = decode_json($json_string);
Tada, now $data is a reference to a deserialized version of the JSON string: if the JSON string contained an object, $data is a hashref; if the JSON string contained an array, $data is an arrayref, etc.
So, in other words, to create an extensible JSON-based DSL that is implemented by Moose objects, all we need to do is create a system that
- takes hash refs to set arguments
has factory methods to create objects, which
- uses
Module::Pluggableto find the available object classes, and - uses the
typeattribute to figure out which object class to use to create the object
- uses
uses coercion to convert hash refs into objects using these factory methods
In practice, we could have a JSON file with the following structure:
{
    "description": "do stuff",
    "actions": [
        {
            "type": "bar",
            "serves_drinks": true,
        },
        {
            "type": "bar",
            "serves_drinks": false,
        }
    ]
}
... and then we could have a Moose object definition like this:
package MyDSL;

use v5.40;
use Moose;

use MyCoercions;

has "description" => (
    is => 'ro',
    isa => 'Str',
);

has 'actions' => (
    is => 'ro',
    isa => 'ArrayOfFoo'
    coerce => 1,
    required => 1,
);

sub say_something {
    say "Hello there, I am described as " . $self->description . " and I am performing my actions: ";

    foreach my $action(@{$self->actions}) {
        $action->say_something;
    }
}
Now, we can write a script that loads this JSON file and create a new object using the flattened arguments:
use v5.40;
use MyDSL;
use JSON::MaybeXS;

my $input_file_name = shift;

my $args = do {
    local $/ = undef;

    open my $input_fh, "<", $input_file_name or die "could not open file";
    <$input_fh>;
};

$args = decode_json($args);

my $dsl = MyDSL->new(%$args);

$dsl->say_something
Output:
Hello there, I am described as do stuff and I am performing my actions:
Hello there, I am a bar
I am serving drinks!
Hello there, I am a bar
In some more detail, this will:
- Read the JSON file and deserialize it;
- Pass the object keys in the JSON file as arguments to a constructor of
the
MyDSLclass; - The
MyDSLclass then uses those arguments to set its attributes, using Moose coercion to convert the "actions" array of hashes into an array ofFoo::Barobjects. - Perform the
say_somethingmethod on theMyDSLobject
Once this is written, extending the scheme to also support a "quux" type
simply requires writing a Foo::Quux class, making sure it has a method
handles_type that returns a truthy value when called with quux as
the argument, and installing it into the perl library path. This is
rather easy to do.
It can even be extended deeper, too; if the quux type requires a list
of arguments rather than just a single argument, it could itself also
have an array attribute with relevant coercions. These coercions could
then be used to convert the list of arguments into an array of objects
of the correct type, using the same schema as above.
The actual DSL is of course somewhat more complex, and also actually does something useful, in contrast to the DSL that we define here which just says things.
Creating an object that actually performs some action when required is left as an exercise to the reader.
The NBD protocol has grown a number of new features over the years. Unfortunately, some of those features are not (yet?) supported by the Linux kernel.
I suggested a few times over the years that the maintainer of the NBD driver in the kernel, Josef Bacik, take a look at these features, but he hasn't done so; presumably he has other priorities. As with anything in the open source world, if you want it done you must do it yourself.
I'd been off and on considering to work on the kernel driver so that I could implement these new features, but I never really got anywhere.
A few months ago, however, Christoph Hellwig posted a patch set that reworked a number of block device drivers in the Linux kernel to a new type of API. Since the NBD mailinglist is listed in the kernel's MAINTAINERS file, this patch series were crossposted to the NBD mailinglist, too, and when I noticed that it explicitly disabled the "rotational" flag on the NBD device, I suggested to Christoph that perhaps "we" (meaning, "he") might want to vary the decision on whether a device is rotational depending on whether the NBD server signals, through the flag that exists for that very purpose, whether the device is rotational.
To which he replied "Can you send a
patch".
That got me down the rabbit hole, and now, for the first time in the 20+ years of being a C programmer who uses Linux exclusively, I got a patch merged into the Linux kernel... twice.
So, what do these things do?
The first patch adds support for the ROTATIONAL flag. If the NBD server mentions that the device is rotational, it will be treated as such, and the elevator algorithm will be used to optimize accesses to the device. For the reference implementation, you can do this by adding a line "rotational = true" to the relevant section (relating to the export where you want it to be used) of the config file.
It's unlikely that this will be of much benefit in most cases (most nbd-server installations will be exporting a file on a filesystem and have the elevator algorithm implemented server side and then it doesn't matter whether the device has the rotational flag set), but it's there in case you wish to use it.
The second set of patches adds support for the WRITE_ZEROES command.
Most devices these days allow you to tell them "please write a N zeroes
starting at this offset", which is a lot more efficient than sending
over a buffer of N zeroes and asking the device to do DMA to copy
buffers etc etc for just zeroes.
The NBD protocol has supported its own WRITE_ZEROES command for a
while now, and hooking it up was reasonably simple in the end. The only
problem is that it expects length values in bytes, whereas the kernel
uses it in blocks. It took me a few tries to get that right -- and then
I also fixed up handling of discard messages, which required the same
conversion.
Getting the Belgian eID to work on Linux systems should be fairly easy, although some people do struggle with it.
For that reason, there is a lot of third-party documentation out there in the form of blog posts, wiki pages, and other kinds of things. Unfortunately, some of this documentation is simply wrong. Written by people who played around with things until it kind of worked, sometimes you get a situation where something that used to work in the past (but wasn't really necessary) now stopped working, but it's still added to a number of locations as though it were the gospel.
And then people follow these instructions and now things don't work anymore.
One of these revolves around OpenSC.
OpenSC is an open source smartcard library that has support for a pretty large number of smartcards, amongst which the Belgian eID. It provides a PKCS#11 module as well as a number of supporting tools.
For those not in the know, PKCS#11 is a standardized C API for offloading cryptographic operations. It is an API that can be used when talking to a hardware cryptographic module, in order to make that module perform some actions, and it is especially popular in the open source world, with support in NSS, amongst others. This library is written and maintained by mozilla, and is a low-level cryptographic library that is used by Firefox (on all platforms it supports) as well as by Google Chrome and other browsers based on that (but only on Linux, and as I understand it, only for linking with smartcards; their BoringSSL library is used for other things).
The official eID software that we ship through eid.belgium.be, also known as "BeID", provides a PKCS#11 module for the Belgian eID, as well as a number of support tools to make interacting with the card easier, such as the "eID viewer", which provides the ability to read data from the card, and validate their signatures. While the very first public version of this eID PKCS#11 module was originally based on OpenSC, it has since been reimplemented as a PKCS#11 module in its own right, with no lineage to OpenSC whatsoever anymore.
About five years ago, the Belgian eID card was renewed. At the time, a new physical appearance was the most obvious difference with the old card, but there were also some technical, on-chip, differences that are not so apparent. The most important one here, although it is not the only one, is the fact that newer eID cards now use a NIST P-384 elliptic curve-based private keys, rather than the RSA-based ones that were used in the past. This change required some changes to any PKCS#11 module that supports the eID; both the BeID one, as well as the OpenSC card-belpic driver that is written in support of the Belgian eID.
Obviously, the required changes were implemented for the BeID module; however, the OpenSC card-belpic driver was not updated. While I did do some preliminary work on the required changes, I was unable to get it to work, and eventually other things took up my time so I never finished the implementation. If someone would like to finish the work that I started, the preliminal patch that I wrote could be a good start -- but like I said, it doesn't yet work. Also, you'll probably be interested in the official documentation of the eID card.
Unfortunately, in the mean time someone added the Applet 1.8 ATR to the card-belpic.c file, without also implementing the required changes to the driver so that the PKCS#11 driver actually supports the eID card. The result of this is that if you have OpenSC installed in NSS for either Firefox or any Chromium-based browser, and it gets picked up before the BeID PKCS#11 module, then NSS will stop looking and pass all crypto operations to the OpenSC PKCS#11 module rather than to the official eID PKCS#11 module, and things will not work at all, causing a lot of confusion.
I have therefore taken the following two steps:
- The official eID packages now conflict with the OpenSC PKCS#11 module. Specifically only the PKCS#11 module, not the rest of OpenSC, so you can theoretically still use its tools. This means that once we release this new version of the eID software, when you do an upgrade and you have OpenSC installed, it will remove the PKCS#11 module and anything that depends on it. This is normal and expected.
- I have filed a pull request against OpenSC that removes the Applet 1.8 ATR from the driver, so that OpenSC will stop claiming that it supports the 1.8 applet.
When the pull request is accepted, we will update the official eID software to make the conflict versioned, so that as soon as it works again you will again be able to install the OpenSC and BeID packages at the same time.
In the mean time, if you have the OpenSC PKCS#11 module installed on your system, and your eID authentication does not work, try removing it.
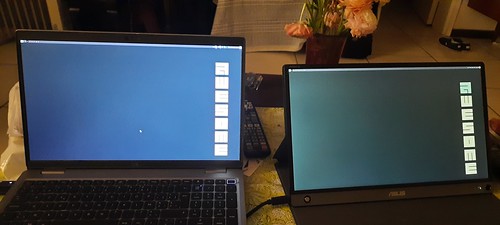
A while ago, I saw Stefano's portable monitor, and thought it was very useful. Personally, I rent a desk at an office space where I have a 27" Dell monitor; but I do sometimes use my laptop away from that desk, and then I do sometimes miss the external monitor.
So a few weeks before DebConf, I bought me one myself. The one I got is about a mid-range model; there are models that are less than half the price of the one that I bought, and there are models that are more than double its price, too. ASUS has a very wide range of these monitors; the cheapest model that I could find locally is a 720p monitor that only does USB-C and requires power from the connected device, which presumably if I were to connect it to my laptop with no power connected would half its battery life. More expensive models have features such as wifi connectivity and miracast support, builtin batteries, more connection options, and touchscreen fancyness.
While I think some of these features are not worth the money, I do think that a builtin battery has its uses, and that I would want a decent resolution, so I got a FullHD model with builtin battery.
The device comes with a number of useful accessories: a USB-C to USB-C cable for the USB-C connectivity as well as to charge the battery; an HDMI-to-microHDMI cable for HDMI connectivity; a magnetic sleeve that doubles as a back stand; a beefy USB-A charger and USB-A-to-USB-C convertor (yes, I know); and a... pen.
No, really, a pen. You can write with it. Yes, on paper. No, not a stylus. It's really a pen.
Sigh, OK. This one:

OK, believe me now?
Good.
Don't worry, I was as confused about this as you just were when I first found that pen. Why would anyone do that, I thought. So I read the manual. Not something I usually do with new hardware, but here you go.
It turns out that the pen doubles as a kickstand. If you look closely at the picture of the laptop and the monitor above, you may see a little hole at the bottom right of the monitor, just to the right of the power button/LED. The pen fits right there.
Now I don't know what the exact thought process was here, but I imagine it went something like this:
- ASUS wants to make money through selling monitors, but they don't want to spend too much money making them.
- A kickstand is expensive.
- So they choose not to make one, and add a little hole instead where you can put any little stick and make that function as a kickstand.
- They explain in the manual that you can use a pen with the hole as a kickstand. Problem solved, and money saved.
Some paper pusher up the chain decides that if you mention a pen in the manual, you can't not ship a pen
- Or perhaps some lawyer tells them that this is illegal to do in some jurisdictions
- Or perhaps some large customer with a lot of clout is very annoying
So in a meeting, it is decided that the monitor will have a pen going along with it
- So someone in ASUS then goes through the trouble of either designing and manufacturing a whole set of pens that use the same color scheme as the monitor itself, or just sourcing them from somewhere; and those pens are then branded (cheaply) and shipped with the monitors.
It's an interesting concept, especially given the fact that the magnetic sleeve works very well as a stand. But hey.
Anyway, the monitor is very nice; the battery lives longer than the battery of my laptop usually does, so that's good, and it allows me to have a dual-monitor setup when I'm on the road.
And when I'm at the office? Well, now I have a triple-monitor setup. That works well, too.
I've been maintaining a number of Perl software packages recently. There's SReview, my video review and transcoding system of which I split off Media::Convert a while back; and as of about a year ago, I've also added PtLink, an RSS aggregator (with future plans for more than just that).
All these come with extensive test suites which can help me ensure that things continue to work properly when I play with things; and all of these are hosted on salsa.debian.org, Debian's gitlab instance. Since we're there anyway, I configured GitLab CI/CD to run a full test suite of all the software, so that I can't forget, and also so that I know sooner rather than later when things start breaking.
GitLab has extensive support for various test-related reports, and while it took a while to be able to enable all of them, I'm happy to report that today, my perl test suites generate all three possible reports. They are:
- The
coverageregex, which captures the total reported coverage for all modules of the software; it will show the test coverage on the right-hand side of the job page (as in this example), and it will show what the delta in that number is in merge request summaries (as in this example - The JUnit report, which tells GitLab in detail which tests were run, what their result was, and how long the test took (as in this example)
- The cobertura report, which tells GitLab which lines in the software were ran in the test suite; it will show up coverage of affected lines in merge requests, but nothing more. Unfortunately, I can't show an example here, as the information seems to be no longer available once the merge request has been merged.
Additionally, I also store the native perl Devel::Cover report as job artifacts, as they show some information that GitLab does not.
It's important to recognize that not all data is useful. For instance, the JUnit report allows for a test name and for details of the test. However, the module that generates the JUnit report from TAP test suites does not make a distinction here; both the test name and the test details are reported as the same. Additionally, the time a test took is measured as the time between the end of the previous test and the end of the current one; there is no "start" marker in the TAP protocol.
That being said, it's still useful to see all the available information in GitLab. And it's not even all that hard to do:
test:
  stage: test
  image: perl:latest
  coverage: '/^Total.* (\d+.\d+)$/'
  before_script:
    - cpanm ExtUtils::Depends Devel::Cover TAP::Harness::JUnit Devel::Cover::Report::Cobertura
    - cpanm --notest --installdeps .
    - perl Makefile.PL
  script:
    - cover -delete
    - HARNESS_PERL_SWITCHES='-MDevel::Cover' prove -v -l -s --harness TAP::Harness::JUnit
    - cover
    - cover -report cobertura
  artifacts:
    paths:
    - cover_db
    reports:
      junit: junit_output.xml
      coverage_report:
        path: cover_db/cobertura.xml
        coverage_format: cobertura
Let's expand on that a bit.
The first three lines should be clear for anyone who's used GitLab CI/CD
in the past. We create a job called test; we start it in the test
stage, and we run it in the perl:latest docker image. Nothing
spectacular here.
The coverage line contains a regular expression. This is applied by
GitLab to the output of the job; if it matches, then the first bracket
match is extracted, and whatever that contains is assumed to contain the
code coverage percentage for the code; it will be reported as such in
the GitLab UI for the job that was ran, and graphs may be drawn to show
how the coverage changes over time. Additionally, merge requests will
show the delta in the code coverage, which may help deciding whether to
accept a merge request. This regular expression will match on a line of
that the cover program will generate on standard output.
The before_script section installs various perl modules we'll need
later on. First, we intall
ExtUtils::Depends. My code
uses
ExtUtils::MakeMaker,
which ExtUtils::Depends depends on (no pun intended); obviously, if your
perl code doesn't use that, then you don't need to install it. The next
three modules -- Devel::Cover,
TAP::Harness::JUnit and
Devel::Cover::Report::Cobertura
are necessary for the reports, and you should include them if you want
to copy what I'm doing.
Next, we install declared dependencies, which is probably a good idea
for you as well, and then we run perl Makefile.PL, which will generate
the Makefile. If you don't use ExtUtils::MakeMaker, update that part to
do what your build system uses. That should be fairly straightforward.
You'll notice that we don't actually use the Makefile. This is because
we only want to run the test suite, which in our case (since these are
PurePerl modules) doesn't require us to build the software first. One
might consider that this makes the call of perl Makefile.PL useless,
but I think it's a useful test regardless; if that fails, then obviously
we did something wrong and shouldn't even try to go further.
The actual tests are run inside a script snippet, as is usual for
GitLab. However we do a bit more than you would normally expect; this is
required for the reports that we want to generate. Let's unpack what we
do there:
cover -delete
This deletes any coverage database that might exist (e.g., due to caching or some such). We don't actually expect any coverage database, but it doesn't hurt.
HARNESS_PERL_SWITCHES='-MDevel::Cover'
This tells the TAP harness that we want it to load the Devel::Cover
addon, which can generate code coverage statistics. It stores that in
the cover_db directory, and allows you to generate all kinds of
reports on the code coverage later (but we don't do that here, yet).
prove -v -l -s
Runs the actual test suite, with verbose output, shuffling (aka,
randomizing) the test suite, and adding the lib directory to perl's
include path. This works for us, again, because we don't actually need
to compile anything; if you do, then -b (for blib) may be required.
ExtUtils::MakeMaker creates a test target in its Makefile, and usually
this is how you invoke the test suite. However, it's not the only way to
do so, and indeed if you want to generate a JUnit XML report then you
can't do that. Instead, in that case, you need to use the prove, so
that you can tell it to load the TAP::Harness::JUnit module by way of
the --harness option, which will then generate the JUnit XML report.
By default, the JUnit XML report is generated in a file
junit_output.xml. It's possible to customize the filename for this
report, but GitLab doesn't care and neither do I, so I don't. Uploading
the JUnit XML format tells GitLab which tests were run and
Finally, we invoke the cover script twice to generate two coverage
reports; once we generate the default report (which generates HTML files
with detailed information on all the code that was triggered in your
test suite), and once with the -report cobertura parameter, which
generates the cobertura XML format.
Once we've generated all our reports, we then need to upload them to
GitLab in the right way. The native perl report, which is in the
cover_db directory, is uploaded as a regular job artifact, which we
can then look at through a web browser, and the two XML reports are
uploaded in the correct way for their respective formats.
All in all, I find that doing this makes it easier to understand how my code is tested, and why things go wrong when they do.
The DebConf video team has been sprinting in preparation for DebConf 23 which will happen in Kochi, India, in September of this year.
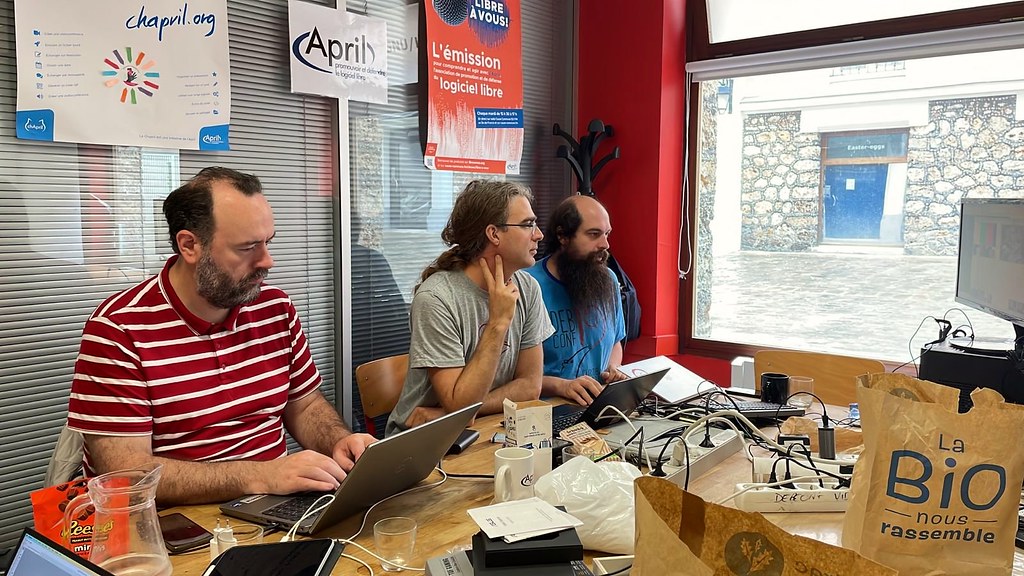
Present were Nicolas "olasd" Dandrimont, Stefano "tumbleweed" Rivera, and yours truly. Additionally, Louis-Philippe "pollo" Véronneau and Carl "CarlFK" Karsten joined the sprint remotely from across the pond.
Thank you to the DPL for agreeing to fund flights, food, and accomodation for the team members. We would also like to extend a special thanks to the Association April for hosting our sprint at their offices.
We made a lot of progress:
- Now that Debian Bookworm has been released, we updated our ansible repository to work with Debian Bookworm. This encountered some issues, but nothing earth-shattering, and almost all of them are handled. The one thing that is still outstanding is that jibri requires OpenJDK 11, which is no longer in bookworm; a solution for that will need to be found in the longer term, but as jibri is only needed for online conferences, it is not quite as urgent (Stefano, Louis-Philippe).
- In past years, we used open "opsis" hardware to do screen grabbing. While these work, upstream development has stalled, and their intended functionality is also somewhat more limited than we would like. As such, we experimented with a USB-based HDMI capture device, and after playing with it for some time, decided that it is a good option and that we would like to switch to it. Support for the specific capture device that we played with has now also been added to all the relevant places. (Stefano, Carl)
- Another open tool that we have been using is voctomix, a software video mixer. Its upstream development has also stalled somewhat . While we managed to make it work correctly on Bookworm, we decided that to ensure long-term viability for the team, it would be preferable if we had an alternative. As such, we quickly investigated Nageru, Sesse's software video mixer, and decided that it can everything we need (and, probably, more). As such, we worked on implementing a user interface theme that would work with our specific requirements. Work on this is still ongoing, and we may decide that we are not ready yet for the switch by the time DebConf23 comes along, but we do believe that the switch is at least feasible. While working on the theme, we found a bug which Sesse quickly fixed for us after a short amount of remote debugging, so, thanks for that! (Stefano, Nicolas, Sesse)
- Our current streaming architecture uses HLS, which requires MPEG-4-based codecs. While fully functional, MPEG-4 is not the most modern of codecs anymore, not to mention the fact that it is somewhat patent-encumbered (even though some of these patents are expired by now). As such, we investigated switching to the AV1 codec for live streaming. Our ansible repository has been updated to support live streaming using that codec; the post-event transcoding part will follow soon enough. Special thanks, again, to Sesse, for pointing out a few months ago on Planet Debian that this is, in fact, possible to do. (Wouter)
- Apart from these big-ticket items, we also worked on various small maintenance things: upgrading, fixing, and reinstalling hosts and services, filing budget requests, and requesting role emails. (all of the team, really).
It is now Sunday the 23rd at 14:15, and while the sprint is coming to an end, we haven't quite finished yet, so some more progress can still be made. Let's see what happens by tonight.
All in all, though, we believe that the progress we made will make the DebConf Videoteam's work a bit easier in some areas, and will make things work better in the future.
See you in Kochi!
Since before I got involved in the eID back in 2014, we have provided official packages of the eID for Red Hat Enterprise Linux. Since RHEL itself requires a license, we did this, first, by using buildbot and mock on a Fedora VM to set up a CentOS chroot in which to build the RPM package. Later this was migrated to using GitLab CI and to using docker rather than VMs, in an effort to save some resources. Even later still, when Red Hat made CentOS no longer be a downstream of RHEL, we migrated from building in a CentOS chroot to building in a Rocky chroot, so that we could continue providing RHEL-compatible packages. Now, as it seems that Red Hat is determined to make that impossible too, I investigated switching to actually building inside a RHEL chroot rather than a derivative one. Let's just say that might be a challenge...
[root@b09b7eb7821d ~]# mock --dnf --isolation=simple --verbose -r rhel-9-x86_64 --rebuild eid-mw-5.1.11-0.v5.1.11.fc38.src.rpm --resultdir /root --define "revision v5.1.11"
ERROR: /etc/pki/entitlement is not a directory is subscription-manager installed?
Okay, so let's fix that.
[root@b09b7eb7821d ~]# dnf install -y subscription-manager
(...)
Complete!
[root@b09b7eb7821d ~]# mock --dnf --isolation=simple --verbose -r rhel-9-x86_64 --rebuild eid-mw-5.1.11-0.v5.1.11.fc38.src.rpm --resultdir /root --define "revision v5.1.11"
ERROR: No key found in /etc/pki/entitlement directory.  It means this machine is not subscribed.  Please use
  1. subscription-manager register
  2. subscription-manager list --all --available (available pool IDs)
  3. subscription-manager attach --pool <POOL_ID>
If you don't have Red Hat subscription yet, consider getting subscription:
  https://access.redhat.com/solutions/253273
You can have a free developer subscription:
  https://developers.redhat.com/faq/
Okay... let's fix that too, then.
[root@b09b7eb7821d ~]# subscription-manager register
subscription-manager is disabled when running inside a container. Please refer to your host system for subscription management.
Wut.
[root@b09b7eb7821d ~]# exit
wouter@pc220518:~$ apt-cache search subscription-manager
wouter@pc220518:~$
As I thought, yes.
Having to reinstall the docker host machine with Fedora just so I can build Red Hat chroots seems like a somewhat excessive requirement, which I don't think we'll be doing that any time soon.
We'll see what the future brings, I guess.